# Formstep Docs — Integrations
# Integrations overview
Every tool Formstep works with and the page that sets each one up: where answers go, where requests come from, what runs inside the form, analytics, and your own site.
## Where the answers go
- [HubSpot](https://formstep.io/docs/integrations/hubspot/) — Update or create the HubSpot contact behind each submission, matched by email.
- [Google Sheets](https://formstep.io/docs/integrations/google-sheets/) — Add every submission to a Google spreadsheet, with the columns you choose.
- [Airtable](https://formstep.io/docs/integrations/airtable/) — Push submissions into an Airtable base with typed field mapping.
- [Notion: submissions](https://formstep.io/docs/integrations/notion/) — Add submissions to a Notion database, with each field mapped to a property.
- [Slack](https://formstep.io/docs/integrations/slack/) — Post new submissions to a Slack channel with custom message templates.
- [Discord](https://formstep.io/docs/integrations/discord/) — Post each form submission to a Discord channel with mentions.
- [Linear](https://formstep.io/docs/integrations/linear/) — Open a Linear issue from each submission, in the team you pick.
- [GitHub](https://formstep.io/docs/integrations/github/) — Open a GitHub issue from each submission, in the repository you pick.
- [Webhooks](https://formstep.io/docs/integrations/webhooks/) — Send each submission to a URL of your own, such as your backend, a serverless function or an automation tool that takes webhooks.
- [n8n: submissions](https://formstep.io/docs/guides/n8n/public-link-submissions/) — Run an n8n workflow when someone submits, edits or abandons a form through its share link, and pass the answers to the next node.
- [Zapier: submissions](https://formstep.io/docs/guides/zapier/public-link-submissions/) — Start a Zap when someone submits, edits or abandons a form through its share link, and send the answers to email, Sheets, Slack or a CRM.
- [Make: submissions](https://formstep.io/docs/guides/make/public-link-submissions/) — Run a Make scenario when someone submits, edits or abandons a form through its share link, and map each answer by its question.
## Where requests come from
- [n8n: requests](https://formstep.io/docs/guides/n8n/send-a-request/) — Create a Formstep request from an n8n workflow, prefill and lock what you already know, then wait for the answer in the same workflow or start another one when a request ends.
- [Zapier: requests](https://formstep.io/docs/guides/zapier/send-a-request/) — Create a Formstep request from any Zapier trigger, prefill and lock the answers you already know, send the link, then find, remind or cancel the request from a later Zap.
- [Make: requests](https://formstep.io/docs/guides/make/requests/) — Create a Formstep request from a Make scenario, prefill it per field, and run a scenario when the recipient completes it, it expires or is canceled.
- [MCP](https://formstep.io/docs/guides/ai-agents/send-a-request/) — Ask a connected agent to send a Formstep request to one person, prefill and lock what you already know, and read the answers back when they are done.
- [Claude, ChatGPT](https://formstep.io/docs/guides/ai-agents/connect/) — Add Formstep to Claude, ChatGPT, Cursor or any tool that supports remote MCP servers, sign in, and pick the workspace the agent may use.
- [REST API](https://formstep.io/docs/developers/quickstart-send-a-request/) — Create an API token, read a form's field keys, and create a prefilled request with curl, from any tool that can make an HTTP call.
## Inside the form
- [Cal.com](https://formstep.io/docs/integrations/cal-com/) — Let respondents choose and book a Cal.com appointment without leaving your form.
- [Stripe](https://formstep.io/docs/building-forms/payment-collection/) — Accept one-time payments from respondents via Stripe.
## Analytics
- [Google Analytics, Axiom](https://formstep.io/docs/integrations/analytics-streaming/) — Send form views, starts and submissions to Google Analytics 4 or Axiom, and, with Axiom, the answers of each submission too.
## On your own site
- [Inline embed, Popup](https://formstep.io/docs/sharing-publishing/embedding-popups/) — Embed your form on a website or show it as a popup over the page.
- [Webflow](https://formstep.io/docs/sharing-publishing/embed-in-webflow/) — Put a Formstep form inside a Webflow page with a Code Embed element, or open it as a popup from a button.
- [WordPress](https://formstep.io/docs/sharing-publishing/embed-in-wordpress/) — Put a Formstep form inside a WordPress page or post with a Custom HTML block.
- [Framer](https://formstep.io/docs/sharing-publishing/embed-in-framer/) — Put a Formstep form inside a Framer page with the Embed component, from the share link or from the embed code.
- [Notion: embed](https://formstep.io/docs/sharing-publishing/embed-in-notion/) — Put a Formstep form inside a Notion page with an Embed block.
## A form’s integrations
Open a form and click **Integrations** (plug icon) in its top bar. The dialog lists every integration, says how each one on this form is doing, and opens the one you pick to set it up, test it or change it. An amber dot on the button means an integration stopped delivering: see [Health and monitoring](https://formstep.io/docs/integrations/health-monitoring/).
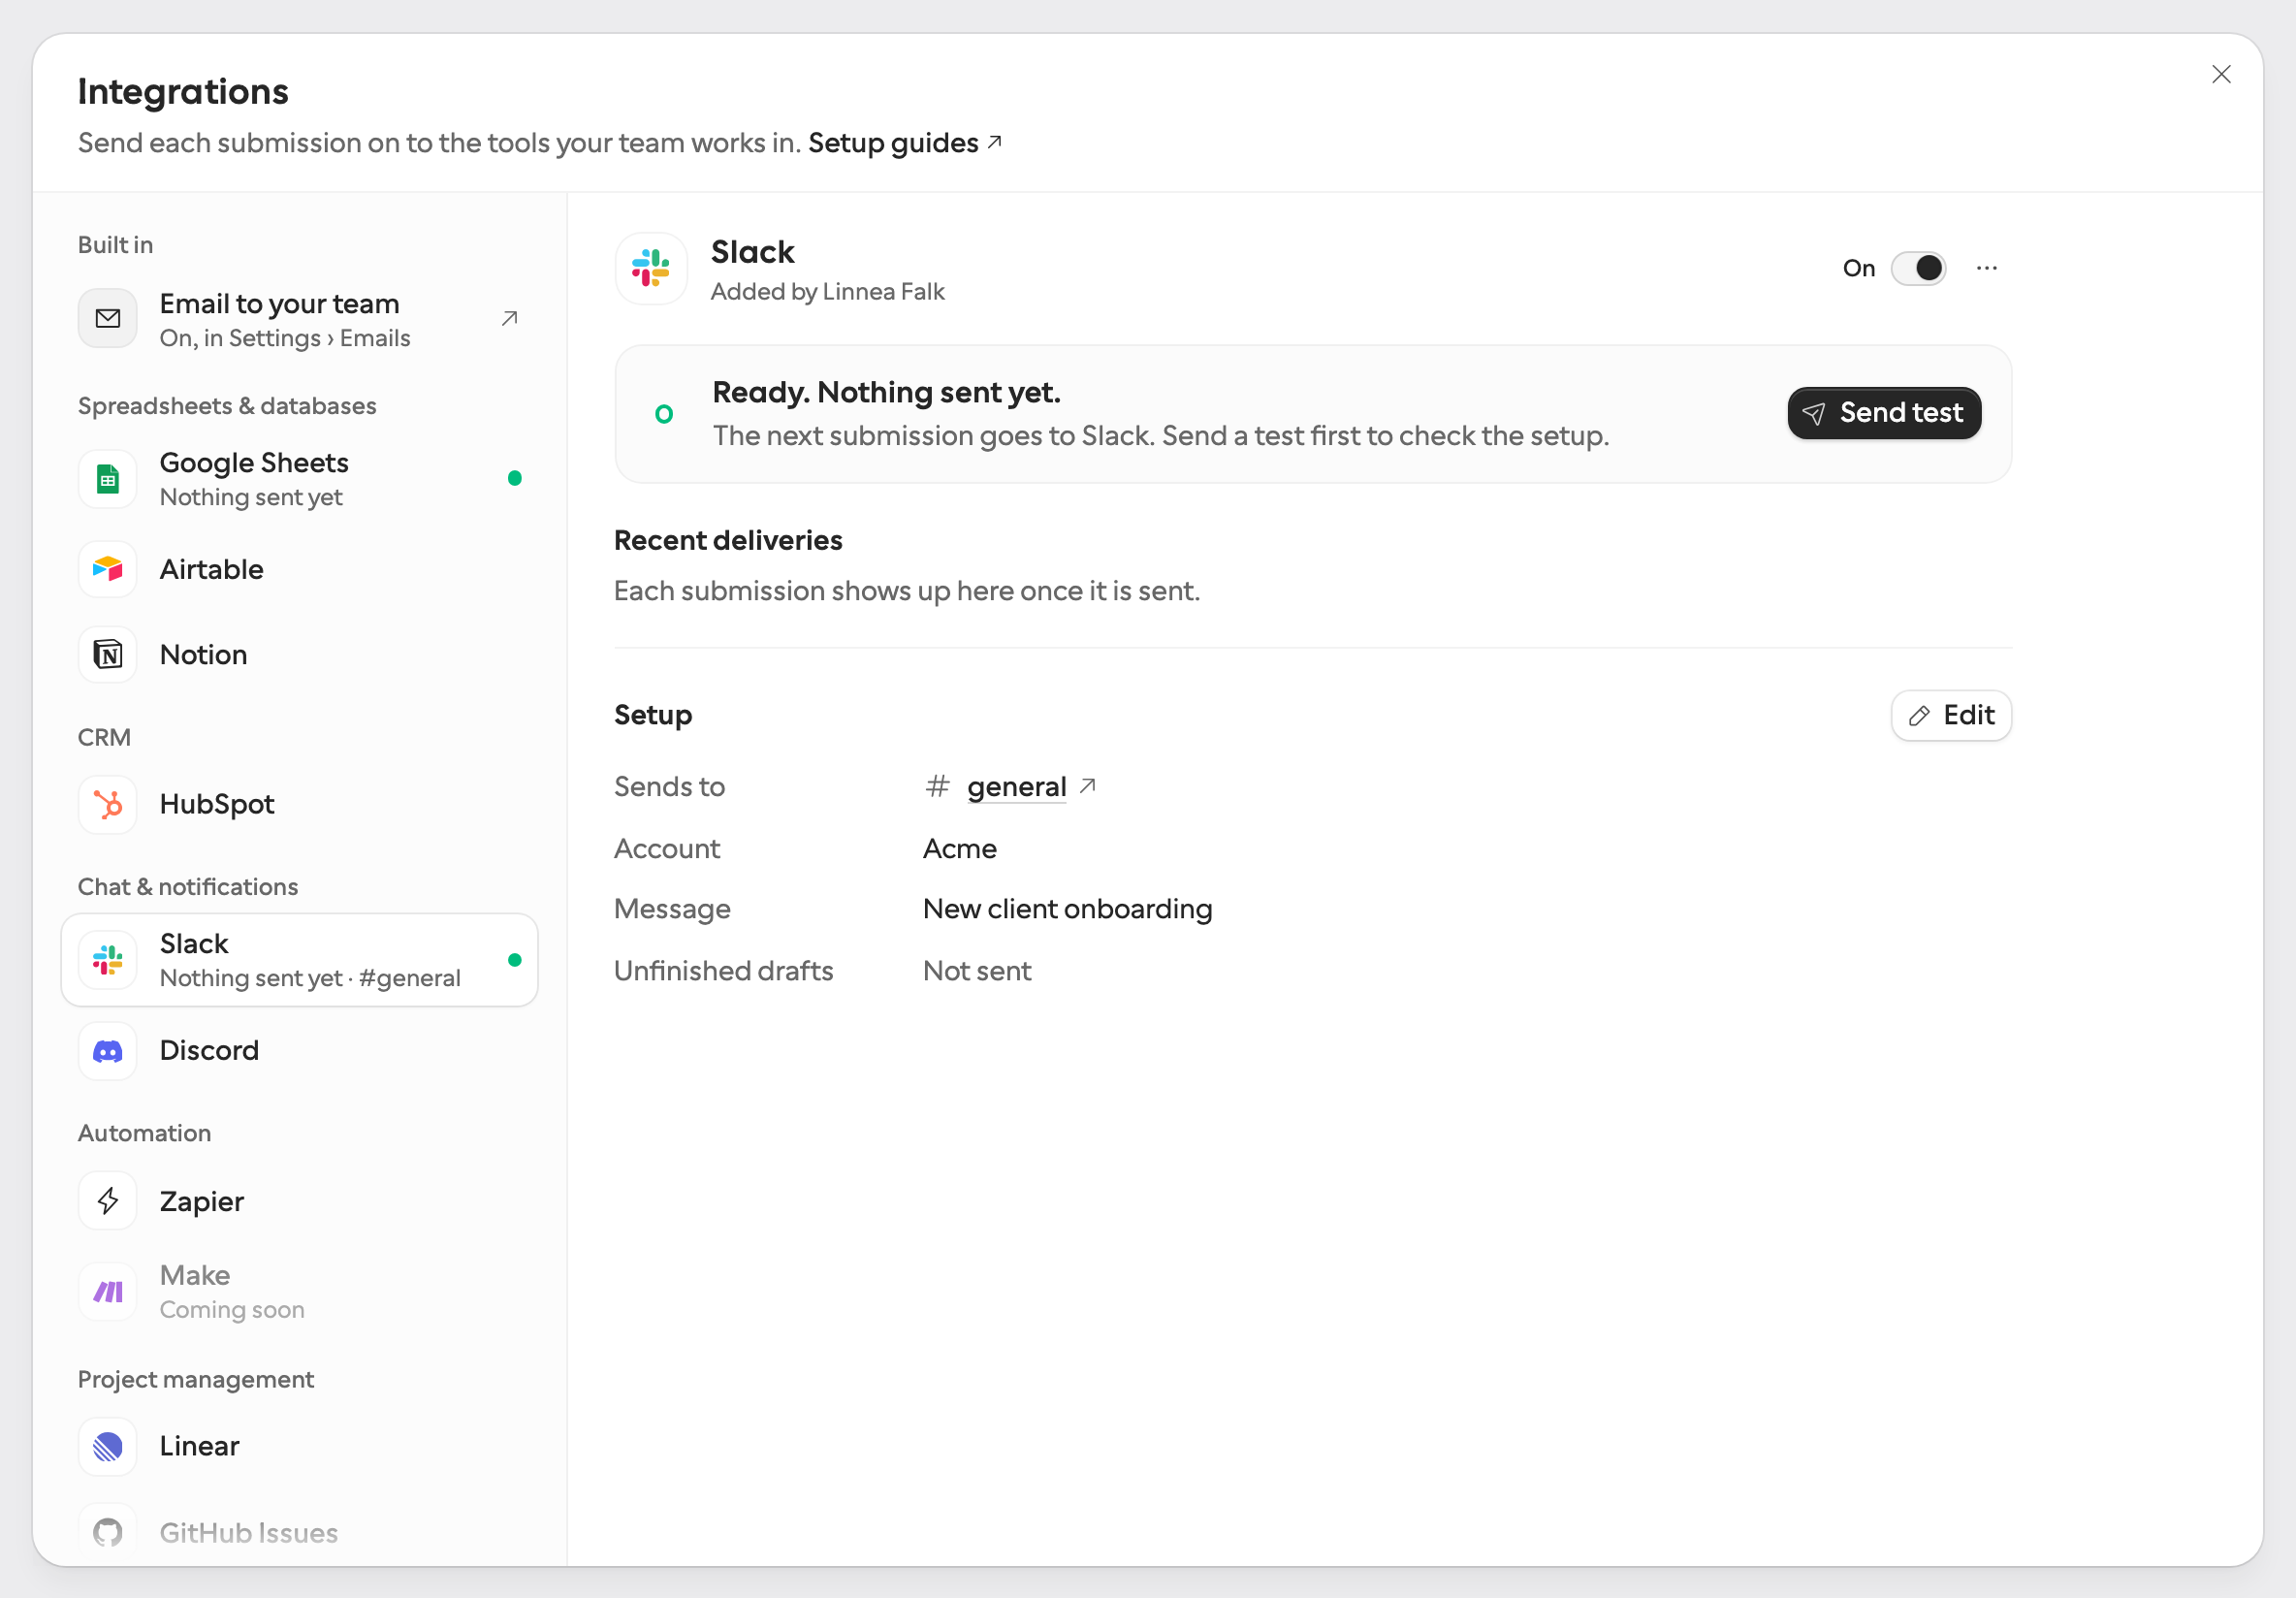
A form's Integrations dialog
Every integration works on every plan. Sending unfinished drafts to an integration needs Pro or Business.
> **Send only what you need**
>
> An integration sends respondents’ answers to another service. Connect only destinations you trust, map only the fields you need, and make sure your privacy notice covers it.
# HubSpot
Update or create the HubSpot contact behind each submission, matched by email. Map fields to contact properties, and pick contacts as recipients of a request.
## What you get
- One HubSpot contact per email address, updated or created
- Each field mapped to a contact property of a matching type
- Edits update the same contact again
- A legal basis for new contacts, for accounts that need one
- A test send that changes only a test contact
For an overview, see [Formstep for HubSpot](https://formstep.io/integrations/hubspot/).
## Connect HubSpot
1. **Open Integrations**
Click **Integrations** (plug icon) in the form's top bar, then pick HubSpot under CRM.
2. **HubSpot account**
Pick a connected HubSpot account, or click **Connect HubSpot account**. Formstep then loads the account's contact properties.
3. **Contact properties**
Match each form field to a contact property. Only compatible properties are listed. Map one form field to Email: Formstep finds the contact by it. If the account needs a legal basis, pick one here too.
4. **Turn it on**
Click **Turn on HubSpot**, then **Send test** to write sample values to the test contact formstep-test\@example.com.
## How a submission finds its contact
The answer mapped to **Email** picks the contact. On each completed submission, Formstep:
1. Updates the HubSpot contact with that email, writing only the properties you mapped.
2. Creates the contact when no contact has that email. A new contact gets the mapped answers, the email, and the legal basis.
When a respondent edits their submission, Formstep updates the same contact again. An empty answer never clears a value in HubSpot. Formstep never changes properties you did not map.
> **Make the email question required**
>
> Without an email answer, the delivery fails and is not retried. Make the question you mapped to Email required.
## Legal basis for new contacts
With data privacy settings on, HubSpot creates no contact without a legal basis. EU accounts have this setting by default. Then the Configure step shows **Legal basis for new contacts** with your account’s options. Pick one to continue.
Formstep writes the legal basis only on a new contact. An existing contact keeps its legal basis, because it records the consent your team collected. You cannot map a form field to the legal basis.
## Property types
| Form field | Compatible HubSpot properties |
| - | - |
| Any field | Single-line text, Multi-line text |
| Number, Rating, Scale | Number, plus text |
| Date | Date picker, Date and time picker, plus text |
| Phone | Phone number, plus text |
| Radio, Dropdown, Checkboxes, Picture choice | Dropdown select, Radio select, Multiple checkboxes, plus text |
| Toggle switch | Single checkbox, plus text |
| Repeating group (whole group) | Text only |
- A choice answer goes to the HubSpot option whose internal value or label matches the Formstep option’s key or label, ignoring case. An answer with no matching option is left out, and the rest of the write goes through.
- Several selected options go to a Multiple checkboxes property together.
- Metadata can be mapped as well, for example **Submitted at** to a date property or **PDF Link** to a text property.
Read-only, calculated, hidden, and archived properties are not listed. The property list refreshes each time you open the integration.
## Test event
**Send test** writes placeholder values to the contact `formstep-test@example.com`, and creates it if needed. It never changes any other contact. Delete the test contact in HubSpot when you are done.
## Find HubSpot contacts for a request
The New request sheet can also add people from HubSpot. Click **Import**, then **Find in HubSpot**, and search by name or email. A contact fills in the person’s email and name. Fill in the rest of the [request](https://formstep.io/docs/requests/overview/) as usual. On Pro and Business, tick several contacts to send one request each: see [Bulk send](https://formstep.io/docs/requests/bulk-send/).
- The form needs no HubSpot integration for this. A contact you pick never fills in form fields.
- The workspace owner connects HubSpot once, under Integrations or from **Import** › **Connect HubSpot**. Then everyone in the workspace can search it. When the connection expires, the owner sees **Reconnect HubSpot** there.
- Answers reach HubSpot only through the form’s HubSpot integration, like every other submission.
- **Try it yourself** never updates HubSpot: a test request does not reach integrations.
> **Only in the dashboard**
>
> An automation cannot search HubSpot through Formstep. It looks the contact up itself, for example with the HubSpot step in n8n or Zapier, and prefills the request with what it found. Prefill and lock the field mapped to Email with the contact’s email, and the answers update that contact. See [Prefill, locked fields and hidden fields](https://formstep.io/docs/requests/creating-requests/#three-buckets).
## What it doesn’t do
- Unfinished drafts are not sent to HubSpot. Only finished submissions and edits update contacts.
- Existing submissions are not exported when you connect. Contacts are updated from the next submission on.
- It writes contacts only, not companies, deals, or tickets.
## Property changes in HubSpot
- Delete a mapped property: Formstep leaves it out, and the rest of the contact still updates.
- Change a property’s type or options: answers are converted to the new definition.
- Change a property to a type that no longer fits the form field: the mapping shows a warning. Map that field again.
## When something goes wrong
- If the integration shows **Connection expired**, for example because the app was uninstalled in HubSpot, click **Reconnect**.
- HubSpot can refuse a value, for example one that breaks a validation rule on the property. The failed event under **Recent events** shows HubSpot’s message. Fix the form field or the property, then send it again with [Retry all](https://formstep.io/docs/integrations/health-monitoring/#failed-deliveries).
- If the contact properties do not load, click **Try again**. If it keeps failing, reconnect the account.
## FAQ
**What access does Formstep need?**
Access to read and write contacts and to read their property definitions. You sign in with HubSpot, so there are no keys to manage. It does not ask for access to companies, deals or other objects.
**Can other workspace members see my HubSpot connection?**
Yes. HubSpot accounts are connected to the workspace. Any member can use any connected account in an integration.
**Can I connect multiple HubSpot accounts?**
Yes. The workspace owner connects more accounts, from Integrations or during setup. Each form picks one account.
**Does an edit create a second contact?**
No. The edit updates the contact with the email in the submission. If the respondent changes the email answer, Formstep updates or creates the contact with the new email.
**How do I remove the integration?**
Open Integrations, pick HubSpot under **On this form**, and choose **Delete integration** in the ⋯ menu. To also revoke Formstep’s access, uninstall the Formstep app in HubSpot under Settings › Integrations › Connected apps.
## Next steps
[Send a request](https://formstep.io/docs/requests/creating-requests/) — Prefill and lock fields for one recipient
[Health and monitoring](https://formstep.io/docs/integrations/health-monitoring/) — Retries, pausing and reconnecting
[Client intake template](https://formstep.io/templates/client-onboarding/) — A form to prefill from a contact, whose answers update it
[Email capture to a CRM-prefilled form](https://formstep.io/workflows/zapier-hubspot-prefill-form/) — A Zap that looks the person up in HubSpot and sends them a prefilled form
# Google Sheets
Add every submission to a Google spreadsheet, with the columns you choose. Formstep creates the spreadsheet, and past submissions can be copied in too.
## What you get
- One row per submission, as it arrives
- The columns you choose, with your own headers
- A spreadsheet Formstep creates for you
- Past submissions copied in when you connect
## Connect Google Sheets
1. **Open Integrations**
Click Integrations in the form's top bar, then pick Google Sheets.
2. **Google account and spreadsheet**
Pick a connected Google account, or click **Connect Google account**. You can name the spreadsheet; it defaults to the form name.
3. **Columns**
All fields are included by default. Turn off **Export all form fields** to remove any, add metadata, and rename column headers.
4. **Turn it on**
Under **More options**, turn on **Export existing submissions** to copy past responses. Click **Turn on Google Sheets**, then **Send test** to add a test row.
## Column mapping
Toggle **Export all form fields** to include every question, or turn it off to pick specific fields and set custom column headers.
Formstep writes values by column position. Renaming a header in Google Sheets is fine; moving or deleting a column puts values in the wrong place. When your mapping changes, Formstep rewrites the header row.
### Repeating groups
Map a [repeating group](https://formstep.io/docs/building-forms/repeating-groups/) in either or both ways:
- The whole group maps to one column. Every item shows as numbered, labeled rows, like “1. Full name: Jane Appleseed, Age: 34, 2. Full name: Marcus Lee, Age: 29”.
- Each member field maps to its own column. The values from every item join with `· `, so the Full name column reads “Jane Appleseed · Marcus Lee”.
### Metadata columns
| Column | What it contains |
| - | - |
| Submitted at | The date and time the response was submitted. |
| Submitter | The respondent's email address when one was captured, otherwise "Anonymous". |
| Submission ID | A unique identifier for the submission. |
| Form name | The internal name of your form. |
| Submission status | "Completed", "Partial" for an unfinished draft, or "Updated" when the respondent edited it. |
| PDF Link | A link to the generated submission PDF. |
| Submission language | The language the response was submitted in, as a code such as de. |
| Channel | "Public link" when the response came through a share link, "Request" when it answered a request. |
| Request ID | The id of the request the response answered. Empty for a share-link response. |
By default, Submitted at and Submitter are included. Add or remove any metadata column during setup, and rename any of them like a normal column header.
## Auto-created spreadsheets
Formstep creates the spreadsheet in your Google Drive when the first submission arrives. If you delete it, Formstep creates a new one on the next submission.
## Test event
**Send test** adds a row of placeholder values, so you can check the columns.
## Backfill existing submissions
Past submissions are copied in the background, oldest first. The integration shows the progress.
## Unfinished drafts
On Pro and Business, Google Sheets can also add [unfinished drafts](https://formstep.io/docs/submissions-analytics/partial-submissions/#unfinished-drafts), set under **More options** › **Unfinished drafts**. Their rows say “Partial” in the Submission status column.
## When something goes wrong
| Problem | What happens |
| - | - |
| Google access ends | You'll be asked to reconnect your Google account. |
| Spreadsheet deleted | Formstep creates a new spreadsheet with the header row and adds the submission, so nothing is lost. |
| Permission denied | The Google account lost access to the spreadsheet. Reconnect the account. |
| Sheet tab renamed | New rows stop with an error. Rename the tab back, or set up the integration again. |
| Google is busy or down | The delivery is retried automatically. |
For retries and pausing, see [Health and monitoring](https://formstep.io/docs/integrations/health-monitoring/).
## FAQ
**Can other workspace members see my Google connection?**
Yes. Google accounts are connected at the workspace level. Any member can use any connected account when setting up an integration, without re-authorizing it.
**What access does Formstep need?**
Permission to create spreadsheets in Google Drive and edit only the ones it creates (per-file access), and read your email and profile name. Formstep cannot read your other Drive files or access anything outside the spreadsheets it creates.
**Can I connect multiple Google accounts?**
A workspace can connect several Google accounts, and each form picks one. The workspace owner adds accounts during setup.
**Can I edit the column mapping later?**
Yes. Open the integration and re-map fields. The next delivery rewrites the header row to match; existing rows keep the values they were written with.
**Can I point the integration at a different spreadsheet?**
No. The spreadsheet is fixed once the integration is created. Delete it and create a new one.
**How do I remove the integration?**
Open Integrations, pick Google Sheets under **On this form**, and choose **Delete integration** in the ⋯ menu. To also revoke Formstep’s access to your Google account, visit your [Google account permissions](https://myaccount.google.com/permissions) page.
## Next steps
[Airtable](https://formstep.io/docs/integrations/airtable/) — Add each submission to an Airtable base
[Notion](https://formstep.io/docs/integrations/notion/) — Add each submission to a Notion database
[Repeating groups](https://formstep.io/docs/building-forms/repeating-groups/) — Let respondents add as many items as they need
[Exporting submissions](https://formstep.io/docs/submissions-analytics/exports/) — Download CSV, Excel or PDF
# Airtable
Push submissions into an Airtable base with typed field mapping. Each submission becomes a new record, and past submissions can be copied in when you connect.
## What you get
- One record per submission
- Each field mapped to a column of a matching type
- Metadata columns, including a link to the submission PDF
- An optional rich-text body built from the answers
- Past submissions copied in when you connect
- Mappings that keep working when you rename a column
## Connect Airtable
1. **Open Integrations**
Click **Integrations** (plug icon) in the form's top bar, then pick Airtable.
2. **Account and table**
Pick a connected Airtable account, or click **Connect Airtable account** and choose the bases Formstep may use. Then pick the base and table.
3. **Fields**
Match each form field to a column. Only columns of a compatible type are listed. You can also write a rich-text body.
4. **Turn it on**
Under **More options**, turn on **Export existing submissions** to copy past responses. Click **Turn on Airtable**, then **Send test** to write a placeholder record.
## Column types
| Form field | Compatible Airtable columns |
| - | - |
| Short / long text | Single line text, Long text, Rich text |
| Email | Email, Single line text, Long text, Rich text |
| Phone | Phone, Single line text, Long text, Rich text |
| URL | URL, Single line text, Long text, Rich text |
| Number | Number, Currency, Percent, Rating, Duration, Single line text, Long text, Rich text |
| Rating / Scale | Rating, Number, Single line text, Long text, Rich text |
| Date | Date, Date & time, Single line text, Long text, Rich text |
| Time | Single line text, Long text, Rich text |
| Toggle switch | Checkbox, Single line text, Long text, Rich text |
| Radio / Dropdown (single) | Single select, Multi-select, Single line text, Long text, Rich text |
| Checkboxes (multi) | Multi-select, Single line text, Long text, Rich text |
| File upload | Attachments, URL, Single line text, Long text, Rich text |
| Signature | URL, Single line text, Long text, Rich text |
| Picture choice | Multi-select, Single select, Single line text, Long text, Rich text |
| Payment | Currency, Number, Single line text, Long text, Rich text |
| Matrix / Ranking | Single line text, Long text, Rich text |
When an answer matches no select option, Formstep creates the option.
You cannot map read-only columns: formula, rollup, count, lookup, linked record, collaborator, created/modified time, created/modified by, auto-number, button, and synced-source columns.
## Repeating groups
Map a [repeating group](https://formstep.io/docs/building-forms/repeating-groups/) in either or both ways:
- The whole group maps to one field. Every item shows as numbered, labeled rows, like “1. Full name: Jane Appleseed, Age: 34, 2. Full name: Marcus Lee, Age: 29”.
- Each member field maps to its own field. The values from every item join with `· `, so the Full name field reads “Jane Appleseed · Marcus Lee”.
## Rich-text body
You can write the content of a Rich text, Long text, or Single line text column in the template editor. Type **@** to insert an answer or metadata, such as PDF Link. Rich text columns keep the formatting. Other columns get plain Markdown.
You can use headings (H1-H4), **bold**, _italic_, ~~strikethrough~~, `inline code`, links, and lists. Images and embeds are not supported.
## Test event
**Send test** writes a record of placeholder values. Select columns get the question’s first option, so no new options are created. Delete the test record when you are done.
## Backfill existing submissions
Past submissions are copied in the background. The integration shows the progress.
## Unfinished drafts
On Pro and Business, Airtable can also add [unfinished drafts](https://formstep.io/docs/submissions-analytics/partial-submissions/#unfinished-drafts), set under **More options** › **Unfinished drafts**. To tell them apart, map Submission status to a single-select or text column: it reads “Partial”, “Completed” or “Updated”.
## Column changes in Airtable
- Rename a column: the mapping updates on the next submission.
- Delete a column: Formstep drops it from the mapping and syncs the other fields.
- Change a column to an incompatible type: that value fails to sync. Open the integration and map the field again.
## When something goes wrong
- If a column is missing from the list, check that you gave Formstep access to the base and that the column type can be written (see [Column types](#column-types)).
- If the integration shows **Connection expired**, for example because you revoked access in Airtable, click **Reconnect**.
- When Airtable is busy, Formstep slows down and retries on its own. For retries and pausing, see [Health and monitoring](https://formstep.io/docs/integrations/health-monitoring/).
## FAQ
**What access does Formstep need?**
It reads and writes records, reads the structure of your bases, and reads your email to know which account is connected. You sign in with Airtable, so there are no keys to manage.
**Can other workspace members see my Airtable connection?**
Yes. Airtable accounts are connected to the workspace. Any member can use any connected account in an integration.
**Can I connect multiple Airtable accounts?**
Yes. The workspace owner connects more accounts, from Integrations or during setup. Each form picks one account.
**What happens if I delete the Airtable table?**
The next submission fails with a “not found” error and the integration stops. You cannot change the base or table later. Delete the integration and create a new one for the new table.
**How do I remove the integration?**
Open Integrations, pick Airtable under **On this form**, and choose **Delete integration** in the ⋯ menu. To also revoke Formstep’s access, remove Formstep in your Airtable account settings.
## Next steps
[Notion](https://formstep.io/docs/integrations/notion/) — Add each submission to a Notion database
[Google Sheets](https://formstep.io/docs/integrations/google-sheets/) — Add each submission to a spreadsheet as a row
[Repeating groups](https://formstep.io/docs/building-forms/repeating-groups/) — Let respondents add as many items as they need
[Health and monitoring](https://formstep.io/docs/integrations/health-monitoring/) — Retries, pausing and reconnecting
# Notion
Add submissions to a Notion database, with each field mapped to a property. Each submission becomes a new page with an optional body, and past submissions can be copied in.
## What you get
- One Notion page per submission
- Each field mapped to a database property
- An optional page body built from the answers
- Past submissions copied in when you connect
- Mappings that keep working when you rename a property
## Connect Notion
1. **Open Integrations**
Click **Integrations** (plug icon) in the form's top bar, then pick Notion.
2. **Workspace and database**
Pick a connected Notion account, or click **Connect Notion workspace**. Share the database with Formstep there: Formstep sees only the databases you share. Then pick the database.
3. **Properties**
Match each form field to a Notion property. Only properties of a compatible type are listed. You can also write a page body.
4. **Turn it on**
Under **More options**, turn on **Export existing submissions** to copy past responses. Click **Turn on Notion**, then **Send test** to create a placeholder page.
## Property types
| Form field | Compatible Notion properties |
| - | - |
| Short / long text | Title, Rich text |
| Email | Email, Title, Rich text |
| Phone | Phone, Title, Rich text |
| URL | URL, Title, Rich text |
| Number / Rating / Scale | Number, Title, Rich text |
| Date | Date, Title, Rich text |
| Time | Title, Rich text |
| Radio / Dropdown (single) | Select, Status, Title, Rich text |
| Checkboxes (multi) | Multi-select, Title, Rich text |
| Toggle switch | Checkbox, Title, Rich text |
| File upload | Files, URL, Title, Rich text |
| Signature | URL, Title, Rich text |
| Picture choice | Multi-select, Title, Rich text |
| Matrix / Ranking / Payment | Title, Rich text |
### Metadata properties
| Metadata | Compatible Notion properties |
| - | - |
| Submitted at | Date, Title, Rich text |
| Respondent email | Email, Title, Rich text |
| Submission ID | Title, Rich text |
| Form name | Title, Rich text |
| Submission status | Status, Select, Title, Rich text |
| PDF Link | URL, Files, Title, Rich text |
| Submission language | Title, Rich text |
| Channel | Select, Title, Rich text |
| Request ID | Title, Rich text |
Channel reads “Public link” or “Request”. Request ID holds the id of the request the response answered. Use them to separate the two kinds of response.
## Repeating groups
Map a [repeating group](https://formstep.io/docs/building-forms/repeating-groups/) in either or both ways:
- The whole group maps to one Rich text or Title property. Every item shows as numbered, labeled rows, like “1. Full name: Jane Appleseed, Age: 34, 2. Full name: Marcus Lee, Age: 29”.
- Each member field maps to its own property. The values from every item join with `· `, so the Full name property reads “Jane Appleseed · Marcus Lee”.
## Rich page body
You can write the page body in the template editor. Type **@** to insert an answer or metadata, such as PDF Link.
You can use paragraphs, **bold**, _italic_, _underline_, and links. Headings, lists, and images show as plain paragraphs.
## Test event
**Send test** creates a real page of placeholder values in your database. Delete the test page when you are done.
## Backfill existing submissions
Past submissions are copied in the background. The integration shows the progress.
## Unfinished drafts
On Pro and Business, Notion can also add [unfinished drafts](https://formstep.io/docs/submissions-analytics/partial-submissions/#unfinished-drafts), set under **More options** › **Unfinished drafts**. To tell them apart, map Submission status to a Status or Select property: it reads “Partial”, “Completed” or “Updated”.
## Property changes in Notion
- Rename a property: the mapping updates on the next submission.
- Delete a property: Formstep drops it from the mapping and syncs the other fields.
- Change a property to an incompatible type, for example number to select: that value can fail to sync. Open the integration and map the field again.
## When something goes wrong
- If a database is missing from the list, connect again and share the database with Formstep on Notion’s consent screen.
- If a value does not sync, its property has a type that does not fit. Open the integration to see which field to fix.
- If you remove Formstep in Notion, under Settings › Connections, the integration stops and the person who set it up gets an email. Connect again to restore it.
- When Notion is busy, Formstep retries on its own. For retries and pausing, see [Health and monitoring](https://formstep.io/docs/integrations/health-monitoring/).
## FAQ
**Does Formstep create the database for me?**
No. Create the database in Notion first, then share it with Formstep during authorization.
**What happens if I delete the Notion database?**
The next submission fails with a “not found” error and the integration stops. You cannot change the database later. Delete the integration and create a new one for the new database.
**Can other workspace members see my Notion connection?**
Yes. Notion accounts are connected to the workspace. Any member can use any connected account in an integration.
**Can I connect multiple Notion accounts?**
Yes. The workspace owner connects more Notion workspaces, from Integrations or during setup. Each form picks one account.
**How do I remove the integration?**
Open Integrations, pick Notion under **On this form**, and choose **Delete integration** in the ⋯ menu. To also revoke Formstep’s access, remove Formstep in Notion, under Settings › Connections.
## Next steps
[Airtable](https://formstep.io/docs/integrations/airtable/) — Add each submission to an Airtable base
[Google Sheets](https://formstep.io/docs/integrations/google-sheets/) — Add each submission to a spreadsheet as a row
[Repeating groups](https://formstep.io/docs/building-forms/repeating-groups/) — Let respondents add as many items as they need
[Health and monitoring](https://formstep.io/docs/integrations/health-monitoring/) — Retries, pausing and reconnecting
# Slack
Post new submissions to a Slack channel with custom message templates. Insert answers with @, mention users and groups, and post to several channels per form.
## What you get
- One message per submission, in the channel you pick
- Your own message template. Type **@** to insert a field value.
- Mentions of users, user groups, and `@here`, `@channel`, or `@everyone`
- A separate message for unfinished drafts, on Pro and Business
- Several Slack integrations per form, each with its own channel and template
## Connect Slack
1. **Open Integrations**
Click Integrations in the form's top bar, then pick Slack.
2. **Workspace and channel**
Pick a connected Slack workspace, or install the Formstep bot in a new one in Slack. Then pick a channel. Public channels show automatically. For a private channel, run /invite @formstep in it in Slack, then refresh the channel list.
3. **Message**
Type @ to insert field values or to mention users, user groups, @here, @channel, or @everyone. Use bold, italic, or links.
4. **Unfinished drafts (optional)**
Under **More options**, on Pro and Business, pick an idle window and write a message for unfinished drafts. Leave it Off to skip.
5. **Turn it on**
Click **Turn on Slack**, then **Send test** to post a preview. Placeholders show as \[Question title], and no real answers are sent.
## Message template
Type **@** in the template to insert an answer, submission details such as the PDF Link, a Slack user or user group to ping, or `@here`, `@channel` and `@everyone`.
Bold, italic, strikethrough, inline code and links work in Slack; underline does not. A message can be up to 3,000 characters, and Formstep shortens a longer one.
## Unfinished drafts
On Pro and Business, Slack can also post a separate message for [unfinished drafts](https://formstep.io/docs/submissions-analytics/partial-submissions/#unfinished-drafts) from the share link, set under **More options** › **Unfinished drafts**.
## When something goes wrong
If the Formstep app is removed from Slack, reconnect it. If the channel is archived or deleted, delete the integration and set up a new one for another channel. For retries and pausing, see [Health and monitoring](https://formstep.io/docs/integrations/health-monitoring/).
## FAQ
**Can I connect multiple Slack workspaces?**
Yes. Each Slack workspace is a separate connection. The workspace owner adds one during a new integration setup.
**Can other workspace members see my Slack connection?**
Yes. Slack connections belong to the workspace. Any member can use any connected Slack workspace in an integration.
**Can Slack post past submissions?**
No. Slack posts only new submissions. For past data, use [Google Sheets](https://formstep.io/docs/integrations/google-sheets/) or [Notion](https://formstep.io/docs/integrations/notion/).
**What permissions does the Formstep bot need?**
Post messages, post to public channels without joining them, read channel lists, read user and group lists (for mentions), and read team info. It does not ask for admin permissions, message history, or file access.
**How do I remove the integration?**
Open Integrations, pick Slack under **On this form**, and choose **Delete integration** in the ⋯ menu. To remove the Formstep bot from Slack too, uninstall it on Slack’s app management page.
## Next steps
[Discord](https://formstep.io/docs/integrations/discord/) — Post each submission to a Discord channel
[Custom webhooks](https://formstep.io/docs/integrations/webhooks/) — Send each submission to your own URL
# Discord
Post each form submission to a Discord channel with mentions. Connect the Formstep bot, write your own message with answers in it, and send a test first.
## What you get
Formstep posts each submission to the channel as it arrives. It connects as a bot, so you do not copy webhook URLs or IDs. Discord posts only new submissions. For past data, use [Google Sheets](https://formstep.io/docs/integrations/google-sheets/) or [Notion](https://formstep.io/docs/integrations/notion/).
## Connect Discord
1. **Open the integration**
Click Integrations in the form's top bar, pick Discord, then click **Connect Discord account**.
2. **Server and channel**
In the Discord window, authorize the Formstep bot, then pick the server. If the bot is not in it yet, click **Invite bot** and refresh. The channel list shows the text and announcement channels the bot can post in, grouped by category.
3. **Message**
Type @ to insert field values, submission metadata such as PDF Link, Discord users, or roles. Use bold, italic, or links.
4. **Unfinished drafts (optional)**
Under **More options**, on Pro and Business, pick an idle window and write a message for unfinished drafts. Leave it Off to skip.
5. **Turn it on**
Click **Turn on Discord**, then **Send test** to post a preview. Placeholders show as \[Question title], and no real answers are sent.
## Unfinished drafts
On Pro and Business, Discord can also post a separate message for [unfinished drafts](https://formstep.io/docs/submissions-analytics/partial-submissions/#unfinished-drafts) from the share link, set under **More options** › **Unfinished drafts**.
## Limits
- A message can be up to 2,000 characters. Formstep shortens a longer one.
- You can mention users and roles. `@everyone` and `@here` do not work, so mention a role instead.
- Formstep posts to text and announcement channels only.
- Bold, italic, strikethrough, inline code and links work; underline does not.
## When something goes wrong
**The bot isn't in my server**
Click **Invite bot** during setup. Pick the server and confirm the permissions. Then go back to Formstep and refresh the server list.
**The integration stopped posting**
Usually the bot was removed from the server, lost its permissions for the channel, or the channel was deleted. Open the integration in the form’s Integrations dialog: **Recent events** shows the error. Invite the bot again or reconnect, or delete the integration and set it up again. See [Health and monitoring](https://formstep.io/docs/integrations/health-monitoring/).
## FAQ
**How do I change which channel messages go to?**
You cannot change the server or channel after setup. Delete the integration and create a new one for the new channel.
**Can I connect multiple Discord servers?**
Yes. Each integration posts to one server and one channel. Add one Discord integration per server to the same form.
**Can other workspace members see my Discord connection?**
Yes. Discord connections belong to the workspace. Any member can use any connected Discord account in an integration.
**What permissions does the Formstep bot need?**
View Channels, Send Messages, Send Messages in Threads, Create Public Threads and Embed Links. It does not ask for Mention Everyone, Read Message History, Administrator, or Manage Messages or Channels. To limit the bot to one channel, set channel permission overrides for the Formstep bot role in Discord.
**How do I remove the integration?**
Open Integrations, pick Discord under **On this form**, and choose **Delete integration** in the ⋯ menu. To remove the bot from your server too, open Server Settings, then Integrations, in Discord and remove Formstep.
## Next steps
[Slack](https://formstep.io/docs/integrations/slack/) — Post each submission to a Slack channel
[Custom webhooks](https://formstep.io/docs/integrations/webhooks/) — Send each submission to your own URL
# Linear
Open a Linear issue from each submission, in the team you pick. Write the title and description yourself, insert answers with @, and copy past submissions in.
## What you get
- One Linear issue per submission, created in your name
- Title and description templates. Type **@** to insert a field value.
- Markdown in the description: bold, lists, headings, code blocks, quotes, and links
- An optional project for every issue
- Past submissions copied in when you connect
## Connect Linear
1. **Open Integrations**
Click Integrations in the form's top bar, then pick Linear. Click **Connect Linear workspace**, or pick an account the workspace already connected.
2. **Workspace and team**
Issues go to this team. Each integration uses one team. Add another integration for a second team.
3. **Issue**
Pick a project for every issue, if you like; it resets when you change the team. Then write the title and description: type @ to insert field values or submission metadata such as PDF Link. The title is plain text, up to 255 characters. The description is markdown.
4. **Unfinished drafts (optional)**
Under **More options**, on Pro and Business, pick an idle window and write a title and description for unfinished drafts. Leave it Off to skip.
5. **Turn it on**
Click **Turn on Linear**, then **Send test** to create a real issue with a \[Test] prefix in the team. Archive or delete it afterwards.
## Backfill existing submissions
When you connect, you can copy past submissions in as Linear issues. Formstep creates them in the background, about one per second.
## Unfinished drafts
On Pro and Business, Linear can also create a separate issue for [unfinished drafts](https://formstep.io/docs/submissions-analytics/partial-submissions/#unfinished-drafts) from the share link, set under **More options** › **Unfinished drafts**. These issues get a `partial-submission` label.
## Limits and behavior
- One new issue per submission. Formstep does not comment on existing issues.
- Formstep cuts a title longer than 255 characters and adds an ellipsis.
- An empty title becomes `New submission to