# Formstep Docs — Public Link
# Public Link overview
Share a published form with anyone through one share link or several, as a link, an embed, a popup or a QR code. When to use the public link and when a request.
## How the public link works
Click **Public link**, the link icon at the top right of the form page. Publishing gives the form its first share link. Anyone who has it can open the form and submit, so one share link collects any number of answers. Add more share links when you want to tell sources apart: each has its own name, language, expiry, response limit and analytics.
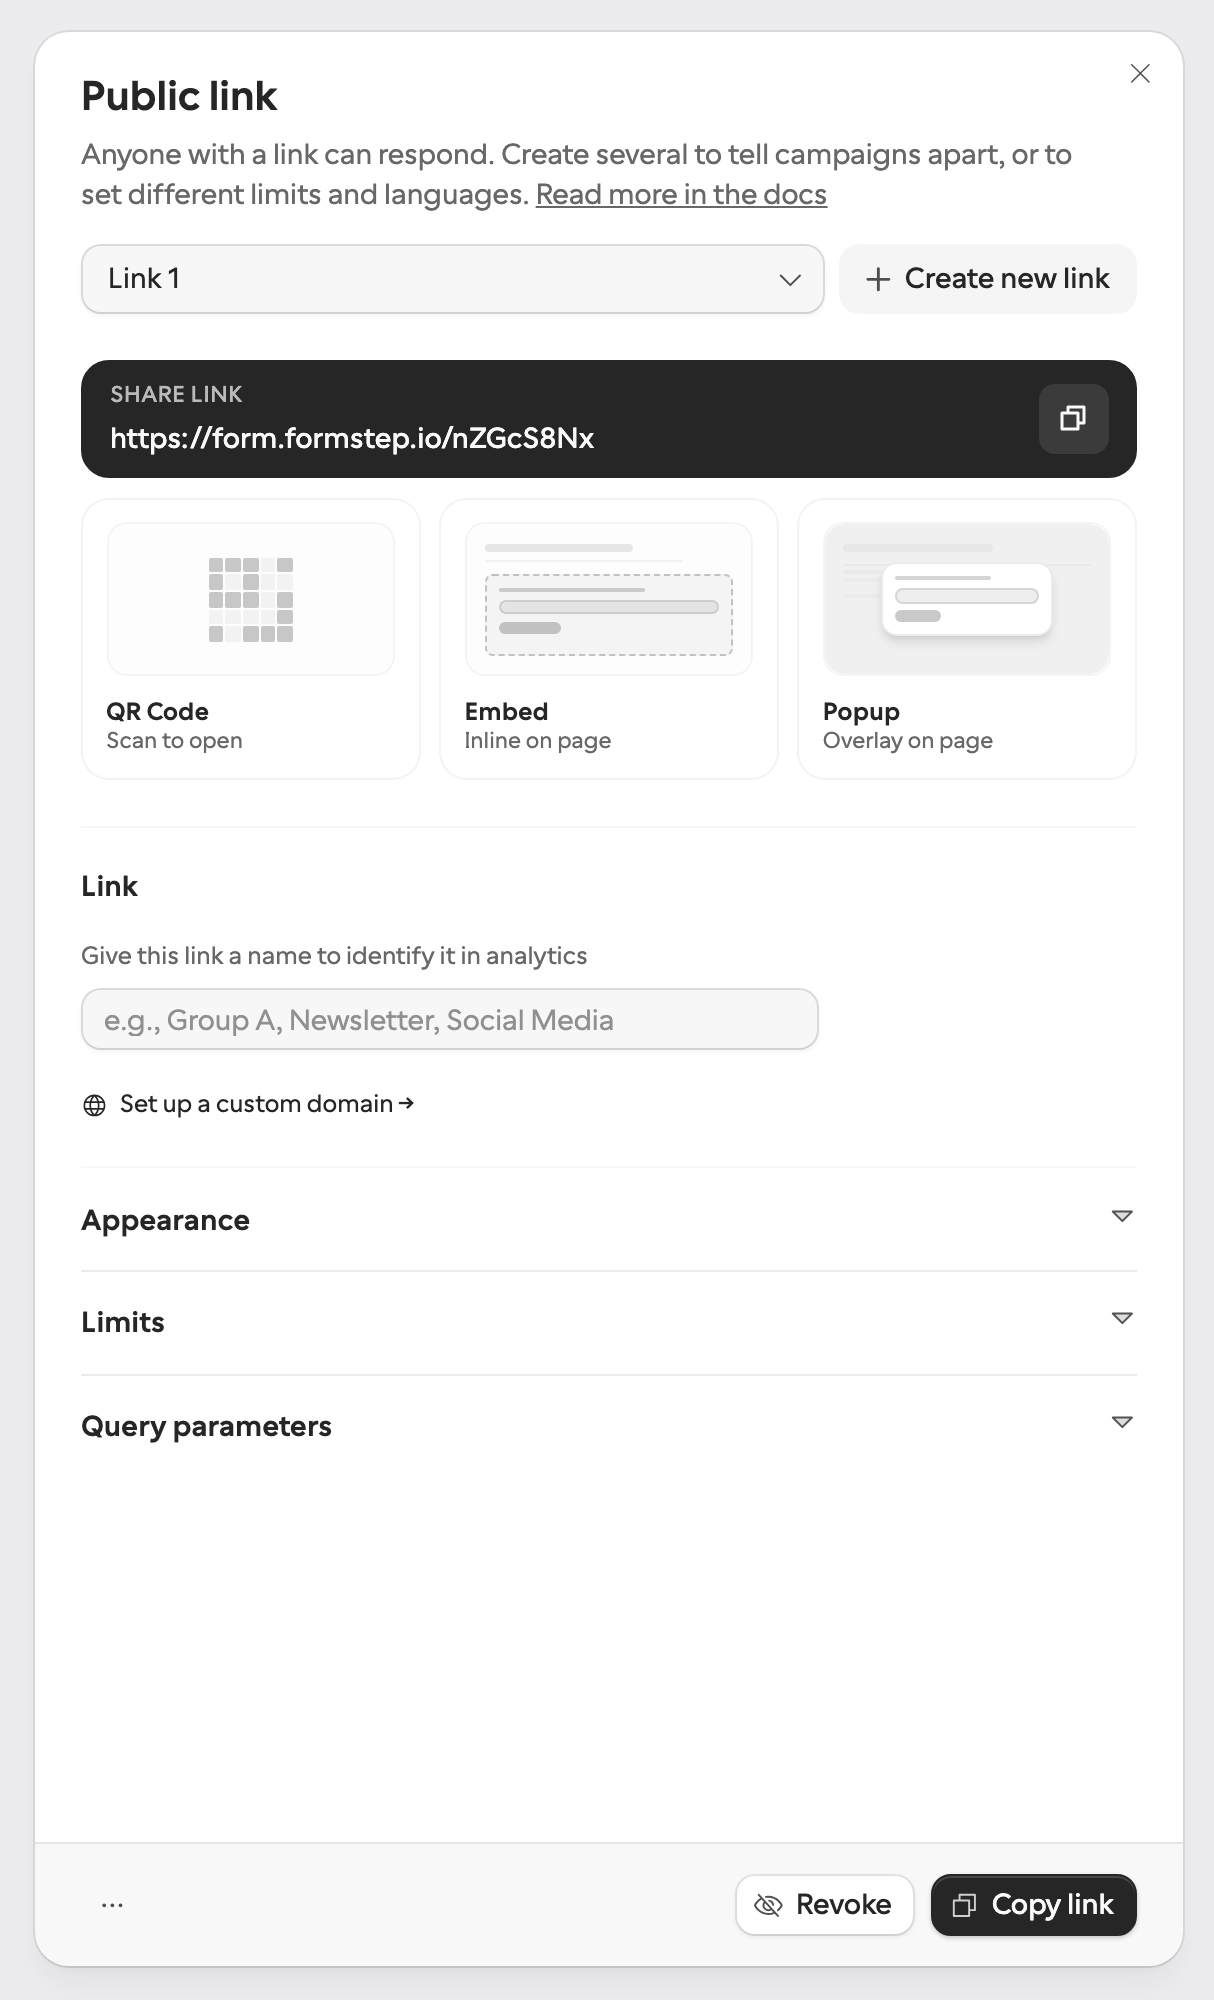
The Public link sheet, from the link icon at the top of the form page.
## Public link or request
A [request](https://formstep.io/docs/requests/overview/) is the other way to send the same form. It goes to one named person, and you can see whether they answered. One form can use both at once.
| If you… | Use |
| - | - |
| Collect from people you cannot name, as with a signup, a survey or a contact form | Public link |
| Want the form on a web page, in an email footer or behind a QR code | Public link |
| Need one specific person to supply, confirm, sign or pay | Request |
| Want to see whether a named person has answered, and remind them | Request |
| Already know some answers and want them filled in for the person | Request |
## Pages in this section
Share and embed
- [Share links](https://formstep.io/docs/sharing-publishing/sharing-embedding/) — Create and manage share links for your form.
- [Embedding & popups](https://formstep.io/docs/sharing-publishing/embedding-popups/) — Embed your form on a website or show it as a popup over the page.
- [Embed a form in Webflow](https://formstep.io/docs/sharing-publishing/embed-in-webflow/) — Put a Formstep form inside a Webflow page with a Code Embed element, or open it as a popup from a button.
- [Embed a form in WordPress](https://formstep.io/docs/sharing-publishing/embed-in-wordpress/) — Put a Formstep form inside a WordPress page or post with a Custom HTML block.
- [Embed a form in Framer](https://formstep.io/docs/sharing-publishing/embed-in-framer/) — Put a Formstep form inside a Framer page with the Embed component, from the share link or from the embed code.
- [Embed a form in Notion](https://formstep.io/docs/sharing-publishing/embed-in-notion/) — Put a Formstep form inside a Notion page with an Embed block.
Who can answer, and until when
- [Authentication gate](https://formstep.io/docs/sharing-publishing/authentication-gate/) — Require respondents to sign in or enter a password before they open your share link, and pick the gate that fits the form.
- [Bot protection (Turnstile)](https://formstep.io/docs/sharing-publishing/captcha-bot-protection/) — Defend share links against bot submissions with Cloudflare Turnstile.
- [Close a form or cap responses](https://formstep.io/docs/sharing-publishing/scheduled-close/) — Stop a form taking answers now or on a date, cap how many responses one share link accepts, and limit how often one person can submit.
# Share links
Create and manage share links for your form. Give each one its own name, expiry, limit and analytics, tag it with UTM parameters, or print it as a QR code.
## Create and manage links
One form can have several share links, each with its own settings.
### Creating a share link
1. **Publish your form**
The first publish creates the form's first share link.
2. **Open the Public link sheet**
Open the form and click **Public link**, the link icon at the top right. Pick a link from the dropdown, or click **Create new link**.
3. **Name the link**
Under **Link**, give it a name such as "Newsletter, May". Only you see the name. Unnamed links show as "Link 1", "Link 2", and so on.
4. **Set optional limits**
Open **Appearance**, **Limits**, or **Query parameters** if you need them. Changes save as you type.

The Public link sheet, from the link icon at the top of the form page.
### Link settings
- On Pro and Business, a **Custom URL** puts the link on one of your [custom domains](https://formstep.io/docs/branding-domains/custom-domains/), at an address like forms.yoursite.com/feedback. The slug has 3 to 64 lowercase letters, numbers and hyphens.
- The **Default language** is the language people see when they arrive through this link. They can still switch.
- With **Set expiration date**, the link stops at the end of that day, in your local time. Visitors then see “Link expired”.
- **Limit response slots** caps how many responses this link accepts. See [Response limits](https://formstep.io/docs/sharing-publishing/scheduled-close/#response-limits).
Give each place you share the form its own link, such as one for your newsletter and one for social media, or one in French and one in English. You can then [compare them in Analytics](https://formstep.io/docs/submissions-analytics/analytics-insights/#comparing-share-links).
### Revoking a link
Click **Revoke** at the bottom of the sheet. The link stops taking responses and shows “Link revoked”. Its responses stay. Click **Re-activate** to turn it back on. Moving a form to [Trash](https://formstep.io/docs/workspaces-teams/trash/) revokes all its links; after a restore, re-activate each one.
### Deleting a link
Open the **⋯** menu at the bottom of the sheet and click delete. A link without responses is removed. A link with responses is revoked instead, so its responses and analytics stay.
## UTM tags for campaign tracking
UTM tags tell Analytics where a visitor came from. Add them to a share link you post somewhere, and the visit shows under that source in the [Traffic Sources](https://formstep.io/docs/submissions-analytics/analytics-insights/#traffic-source-classification) chart:
- `utm_source` says where the traffic comes from, such as facebook or newsletter.
- `utm_medium` says how it arrives, such as social, email or cpc. It sets the category in Traffic Sources.
- `utm_campaign` names the campaign, such as may-launch.
```
https://forms.yoursite.com/feedback?utm_source=linkedin&utm_medium=social&utm_campaign=product-launch
```
Without UTM tags, Formstep uses the site the visitor came from, which some apps hide. UTM values are not saved with each submission. To save one, add a [hidden field](https://formstep.io/docs/building-forms/hidden-fields/) with the same name, such as utm\_source. It then shows in the submissions table too.
### Add them without editing the URL
The **Query parameters** section of the Public link sheet lists the three UTM tags and every hidden field on the form. Values you fill in are added to the copied link and the QR code, but not to embed and popup snippets.
## QR codes
In the Public link sheet, pick a link and click the **QR Code** card, then **Download PNG** (512 × 512 px). The code opens the same URL as **Copy link**. Use one link per placement, such as one for a poster and one for packaging. Scan a test print before you print many.
## Social preview
A link posted in chat or on social media shows a preview with the form’s title and description. To change the title, description, image and icon, open **Appearance**, **Share link preview** in the Public link sheet.
On a [custom domain](https://formstep.io/docs/branding-domains/custom-domains/), you can also set defaults for all forms on the domain, and hide forms from search engines. Forms on formstep.io are always hidden from search engines.
> **Test your link**
>
> Open the link in a private window to see what respondents see.
## Next steps
[Embedding & popups](https://formstep.io/docs/sharing-publishing/embedding-popups/) — Embed or show your form as a popup
[Your own domains](https://formstep.io/docs/branding-domains/custom-domains/) — Serve forms from your own domain
[Share link analytics](https://formstep.io/docs/submissions-analytics/analytics-insights/#comparing-share-links) — Compare performance per link
[Response limits](https://formstep.io/docs/sharing-publishing/scheduled-close/#response-limits) — Cap how many responses a link accepts
# Embedding & popups
Embed your form on a website or show it as a popup over the page. Pick the options in the Public link sheet, then paste one snippet into your site.
Each snippet uses the share link selected in the sheet, with its expiry, response limit, custom domain and analytics. Query parameter values are not included. See [Share links](https://formstep.io/docs/sharing-publishing/sharing-embedding/).
## Inline embed
An inline embed shows the form inside your page.
1. Open the **Public link** sheet and click the **Embed** card.
2. Set the height and choose what to hide.
3. Click **Copy embed code** and paste it into your site’s HTML.
With **Auto-resize height** on, the embed grows with the form, so respondents never scroll inside it. Some site builders remove the small script this adds; then turn it off and set a height that fits. **Lazy load** waits to load the form until the visitor scrolls to it, which speeds up a page where the form sits further down.
## Popup
A popup shows the form on top of your page.
1. Open the **Public link** sheet and click the **Popup** card.
2. Choose how it opens, where it sits and how it looks.
3. Click **Copy popup code** and paste it into your site.
Under **Trigger**, pick how the popup opens. **Automatically on page load** opens it once the page has loaded, after an optional delay, and **Show once per session** stops it from opening again on every page of the same visit. **When a function is called** opens it from your own button or link: the comment in the copied code names the function to call, and the [site builder pages](#site-builders) show a button that calls it.
**Auto-close after submission** closes the popup three seconds after the respondent submits. It is off by default.
## Color scheme
Embeds and popups have the same color scheme setting, and it overrides the form’s own theme inside the frame. The default, **Let user specify**, follows the visitor’s light or dark preference. **Dark mode** and **Light mode** always use that mode.
> **Match your site's theme**
>
> If your website is always dark, pick Dark mode so the form blends in. To theme the form itself, see [Appearance & theming](https://formstep.io/docs/branding-domains/appearance-theming/).
## Step by step for your site builder
[Webflow](https://formstep.io/docs/sharing-publishing/embed-in-webflow/) — A Code Embed element
[WordPress](https://formstep.io/docs/sharing-publishing/embed-in-wordpress/) — A Custom HTML block
[Framer](https://formstep.io/docs/sharing-publishing/embed-in-framer/) — The Embed component
[Notion](https://formstep.io/docs/sharing-publishing/embed-in-notion/) — An Embed block, from the form's address
## Next steps
[Share links](https://formstep.io/docs/sharing-publishing/sharing-embedding/) — Create and manage share link URLs
[QR codes](https://formstep.io/docs/sharing-publishing/sharing-embedding/#qr-codes) — Generate and place scannable codes
[Your own domains](https://formstep.io/docs/branding-domains/custom-domains/) — Serve forms from your own domain
[Appearance & theming](https://formstep.io/docs/branding-domains/appearance-theming/) — Theme, cover, logo, dark mode
# Embed a form in Webflow
Put a Formstep form inside a Webflow page with a Code Embed element, or open it as a popup from a button. Which Webflow plans allow it, and what the Designer shows.
The [Code Embed element](https://help.webflow.com/hc/en-us/articles/33961332238611-Custom-code-embed) is available on a Workspace on Core, Growth, Agency or Freelancer, or on a site with an active Site plan.
## 1. Copy the embed code
In Formstep, open the **Public link** sheet, click the **Embed** card, then **Copy embed code**.
## 2. Add a Code Embed element
1. In the Webflow Designer, open the **Add** panel and add a **Code Embed** element where the form should sit.
2. Paste the code.
3. Save and close the code editor.
The embed is as wide as the element it sits in. Its height is the one you set in Formstep.
## What the Designer shows
With **Auto-resize height** off, Webflow previews the form on the canvas. With it on, the code holds a script, and the Designer shows a placeholder. The script runs once you preview or publish the site, so check the height on the published page.
## Open the form as a popup
Click the **Popup** card in the Public link sheet and copy the popup code. Paste it into a Code Embed element anywhere on the page. The Designer shows a placeholder for it.
With the trigger **Automatically on page load**, nothing more is needed. To open it from a button, add the button to the same Code Embed, with the function name from the comment in your code:
```
```
> **If the form does not show**
>
> Look at the published page: a script never runs on the canvas. If the Add panel has no Code Embed element, the Workspace or site plan does not include it.
## Next steps
[Embedding & popups](https://formstep.io/docs/sharing-publishing/embedding-popups/) — Every embed and popup setting
[Appearance & theming](https://formstep.io/docs/branding-domains/appearance-theming/) — Make the form look like your site
# Embed a form in WordPress
Put a Formstep form inside a WordPress page or post with a Custom HTML block. What WordPress.com plans allow, and why WordPress may remove the code when you save.
You need a WordPress user who may post unfiltered HTML. On a single site you host yourself, that is an Administrator or an Editor. On WordPress.com, you need a paid plan with hosting features activated. See [If WordPress removes the code](#code-removed).
## 1. Copy the embed code
In Formstep, open the **Public link** sheet, click the **Embed** card, then **Copy embed code**.
## 2. Add a Custom HTML block
1. Open the page or post in the block editor.
2. Click the **Block Inserter** and search for HTML, or type `/html` in a new paragraph and press Enter.
3. Click **Edit HTML**, paste the code, and click **Update**. The preview beside the code shows the form. Before WordPress 7.0 the block is one text box: paste the code straight into it.
4. Save or publish the page.
WordPress describes the block on its [Custom HTML block page](https://wordpress.org/documentation/article/custom-html/) and [WordPress.com’s page](https://wordpress.com/support/wordpress-editor/blocks/custom-html-block/).
## Open the form as a popup
Click the **Popup** card in the Public link sheet and copy the popup code. Paste it into a Custom HTML block on the page. With the trigger **Automatically on page load**, nothing more is needed. To open it from a button, add the button to the same block, with the function name from the comment in your code:
```
```
## If WordPress removes the code
WordPress removes the embed and popup code in two cases:
- Your role may not post unfiltered HTML, as with a Contributor. WordPress strips the code when such a user saves. Ask an Administrator to add the block.
- On WordPress.com, the plan has no hosting features activated. A paid plan alone is not enough; WordPress.com’s help page says installing one plugin activates them. Then paste the code again.
> **If the form does not grow**
>
> If the form shows but does not grow with its content, turn **Auto-resize height** off in Formstep and set a height that fits your form.
## Next steps
[Embedding & popups](https://formstep.io/docs/sharing-publishing/embedding-popups/) — Every embed and popup setting
[Appearance & theming](https://formstep.io/docs/branding-domains/appearance-theming/) — Make the form look like your site
# Embed a form in Framer
Put a Formstep form inside a Framer page with the Embed component, from the share link or from the embed code.
## 1. Copy the embed code
In Formstep, open the **Public link** sheet and click the **Embed** card. Leave **Auto-resize height** off: in Framer you size the Embed component on the canvas, and the form scrolls inside it. Click **Copy embed code**.
## 2. Add an Embed component
1. In Framer, open the **Insert** menu and search for **Embed**.
2. Drag the Embed component onto the canvas, where the form should sit.
3. Paste the code into the **HTML** section of the component.
4. Size the component on the canvas, then preview or publish the site.
### Or use the link
The Embed component also takes a URL. Use the address inside the embed code, the part in quotes after `src=`. It is your share link with `?embed=1` at the end, which leaves out the page around the form:
```
https://form.formstep.io/Abc12XYz?embed=1
```
> **Popups in Framer**
>
> The popup code is a script, and [Framer’s help page](https://www.framer.com/help/articles/how-to-add-an-iframe-or-embed-script/) says a script may need extra code around it to run in an Embed component. The inline embed needs none.
## Next steps
[Embedding & popups](https://formstep.io/docs/sharing-publishing/embedding-popups/) — Every embed and popup setting
[Appearance & theming](https://formstep.io/docs/branding-domains/appearance-theming/) — Make the form look like your site
# Embed a form in Notion
Put a Formstep form inside a Notion page with an Embed block. Notion takes a link, not HTML, so you paste the form address with ?embed=1.
## 1. Copy the form’s embed address
In Formstep, open the **Public link** sheet, click the **Embed** card, choose what to hide, and click **View code**. Copy only the address inside the code, the part in quotes after `src=`. It starts with `https`:
```
https://form.formstep.io/Abc12XYz?embed=1
```
It is your share link with `?embed=1` at the end, which leaves out the page around the form. What you chose to hide is in the address too.
## 2. Add an Embed block
1. In Notion, type `/embed` on a new line, or click the **+** beside it and choose **Embed**.
2. Paste the address and confirm.
3. Hover over the embed and drag the bars at its sides to size it.
Notion explains embeds on its [help page on embeds](https://www.notion.com/help/embed-and-connect-other-apps).
## What does not apply in Notion
Height and auto-resize belong to the HTML code, which Notion does not take. The embed is the size you drag it to, and a longer form scrolls inside it. Popups do not work either: the popup code is a script, and a Notion page runs none.
> **If the form does not show**
>
> Check that you pasted the address and not the whole code, and that the address opens the form in a browser tab.
## Next steps
[Embedding & popups](https://formstep.io/docs/sharing-publishing/embedding-popups/) — Every embed and popup setting
[Notion integration](https://formstep.io/docs/integrations/notion/) — Send each submission to a Notion database
# Authentication gate
Require respondents to sign in or enter a password before they open your share link, and pick the gate that fits the form. Requests skip both.
Both gates apply to share links only. A [request](https://formstep.io/docs/requests/creating-requests/) goes to one recipient on their own link, so it skips them.
## Require sign-in
Open **Settings**, the **Public link access** tab, and turn on **Require sign-in**. People then sign in with Google or a link sent to their email before they can open the form.
- Their email is saved with the submission.
- Unfinished answers belong to their account, so they can continue on another device.
- Each person can submit once across all their devices, unless you allow more under [Limits per respondent](https://formstep.io/docs/sharing-publishing/scheduled-close/#per-respondent-limits).
Use it for internal forms, where every answer should carry a verified company email, for customer-only forms, and for forms where anonymous answers are too risky. Sign-ups and contact forms lose answers when people have to sign in, so use [bot protection](https://formstep.io/docs/sharing-publishing/captcha-bot-protection/) on those.
The gate verifies the person who opens the form. To verify an email address typed into an Email question, use [Respondent email verification](https://formstep.io/docs/building-forms/email-verification/), which sends a one-time code and works without sign-in.
## Password
Turn on **Password** in **Settings**, **Public link access**, and type a password. Visitors see “Password required” and none of the questions until they enter it. Anyone with the password can submit.
> **Turn on the switch and set a password together**
>
> If the switch is on but no password is saved, publishing warns you, and the form stays open to everyone.
### Changing the password
You can change the password at any time. People already filling in the form can finish; new visitors need the new password. To stop one password from being reused without end, add a [response limit](https://formstep.io/docs/sharing-publishing/scheduled-close/#response-limits) to the share link. A limit of 1 makes the link single-use.
## Next steps
[Bot protection (Turnstile)](https://formstep.io/docs/sharing-publishing/captcha-bot-protection/) — Block automated submissions on share links
[Close a form or cap responses](https://formstep.io/docs/sharing-publishing/scheduled-close/) — Close on a date, or cap responses per share link
# Bot protection (Turnstile)
Defend share links against bot submissions with Cloudflare Turnstile. When it runs, who can turn it off, and the extra setup a custom domain needs.
## How it works
When a respondent submits, Turnstile checks in the background that they are not a bot. In rare cases a small dialog asks them to confirm, with no image puzzles. A submission that fails the check is rejected, and the respondent can try again. Requests skip the check, because a [request](https://formstep.io/docs/requests/overview/) link belongs to one recipient.
## Forms on formstep.io
On `form.formstep.io` links, bot protection needs no setup.
- On Free, it is always on.
- On Pro and Business, turn it on or off per form in **Settings**, **Public link access**, **Spam protection**. If your plan lapses, it turns back on after 30 days. See [Upgrading & downgrading](https://formstep.io/docs/subscription-billing/upgrading-downgrading/#grace-period).
## Only if you use a custom domain
On a [custom domain](https://formstep.io/docs/branding-domains/custom-domains/) (Pro and Business), such as `fill.yourdomain.com`, bot protection needs your own free Turnstile keys, because Formstep’s key only covers formstep.io. If all your forms use formstep.io links, skip this section.
1. **Add your custom domain first**
The Bot Protection card on the Domains page appears once the workspace has a custom domain.
2. **Create a Cloudflare account**
Sign up for a free account at [dash.cloudflare.com](https://dash.cloudflare.com) if you don't have one.
3. **Create a Turnstile widget**
In [Turnstile](https://dash.cloudflare.com/?to=/:account/turnstile), add a widget with your custom domains as allowed hostnames.
4. **Copy your keys**
Copy the **Site key** and **Secret key**.
5. **Paste the keys in Formstep**
Open **Domains** in the sidebar, find the **Bot Protection** card, paste both keys, and save. They apply to the whole workspace.
6. **Turn it on per form**
Turn on **Spam protection** in each form's **Settings**, **Public link access**.
Without keys, bot protection cannot run on the custom domain:
| Owner | Custom domain without keys |
| - | - |
| Pro or Business | Submissions go through without a check. |
| Free, guest, or a plan lapsed past day 30 | Submissions on the branded URL are rejected. The formstep.io link keeps working. |
## Next steps
[Authentication gate](https://formstep.io/docs/sharing-publishing/authentication-gate/) — Ask for sign-in or a password
[Your own domains](https://formstep.io/docs/branding-domains/custom-domains/) — Set up branded form URLs
# Close a form or cap responses
Stop a form taking answers now or on a date, cap how many responses one share link accepts, and limit how often one person can submit.
## Close the form
Open **Settings** (the gear icon) and the **Submissions** tab. Under **Accepting submissions**, pick **Closed** to stop taking answers now, or **Until a date** to close the form on its own on that date. Until then, the form’s status badge reads _Closes_ with the date. To reopen the form, pick **Open**.
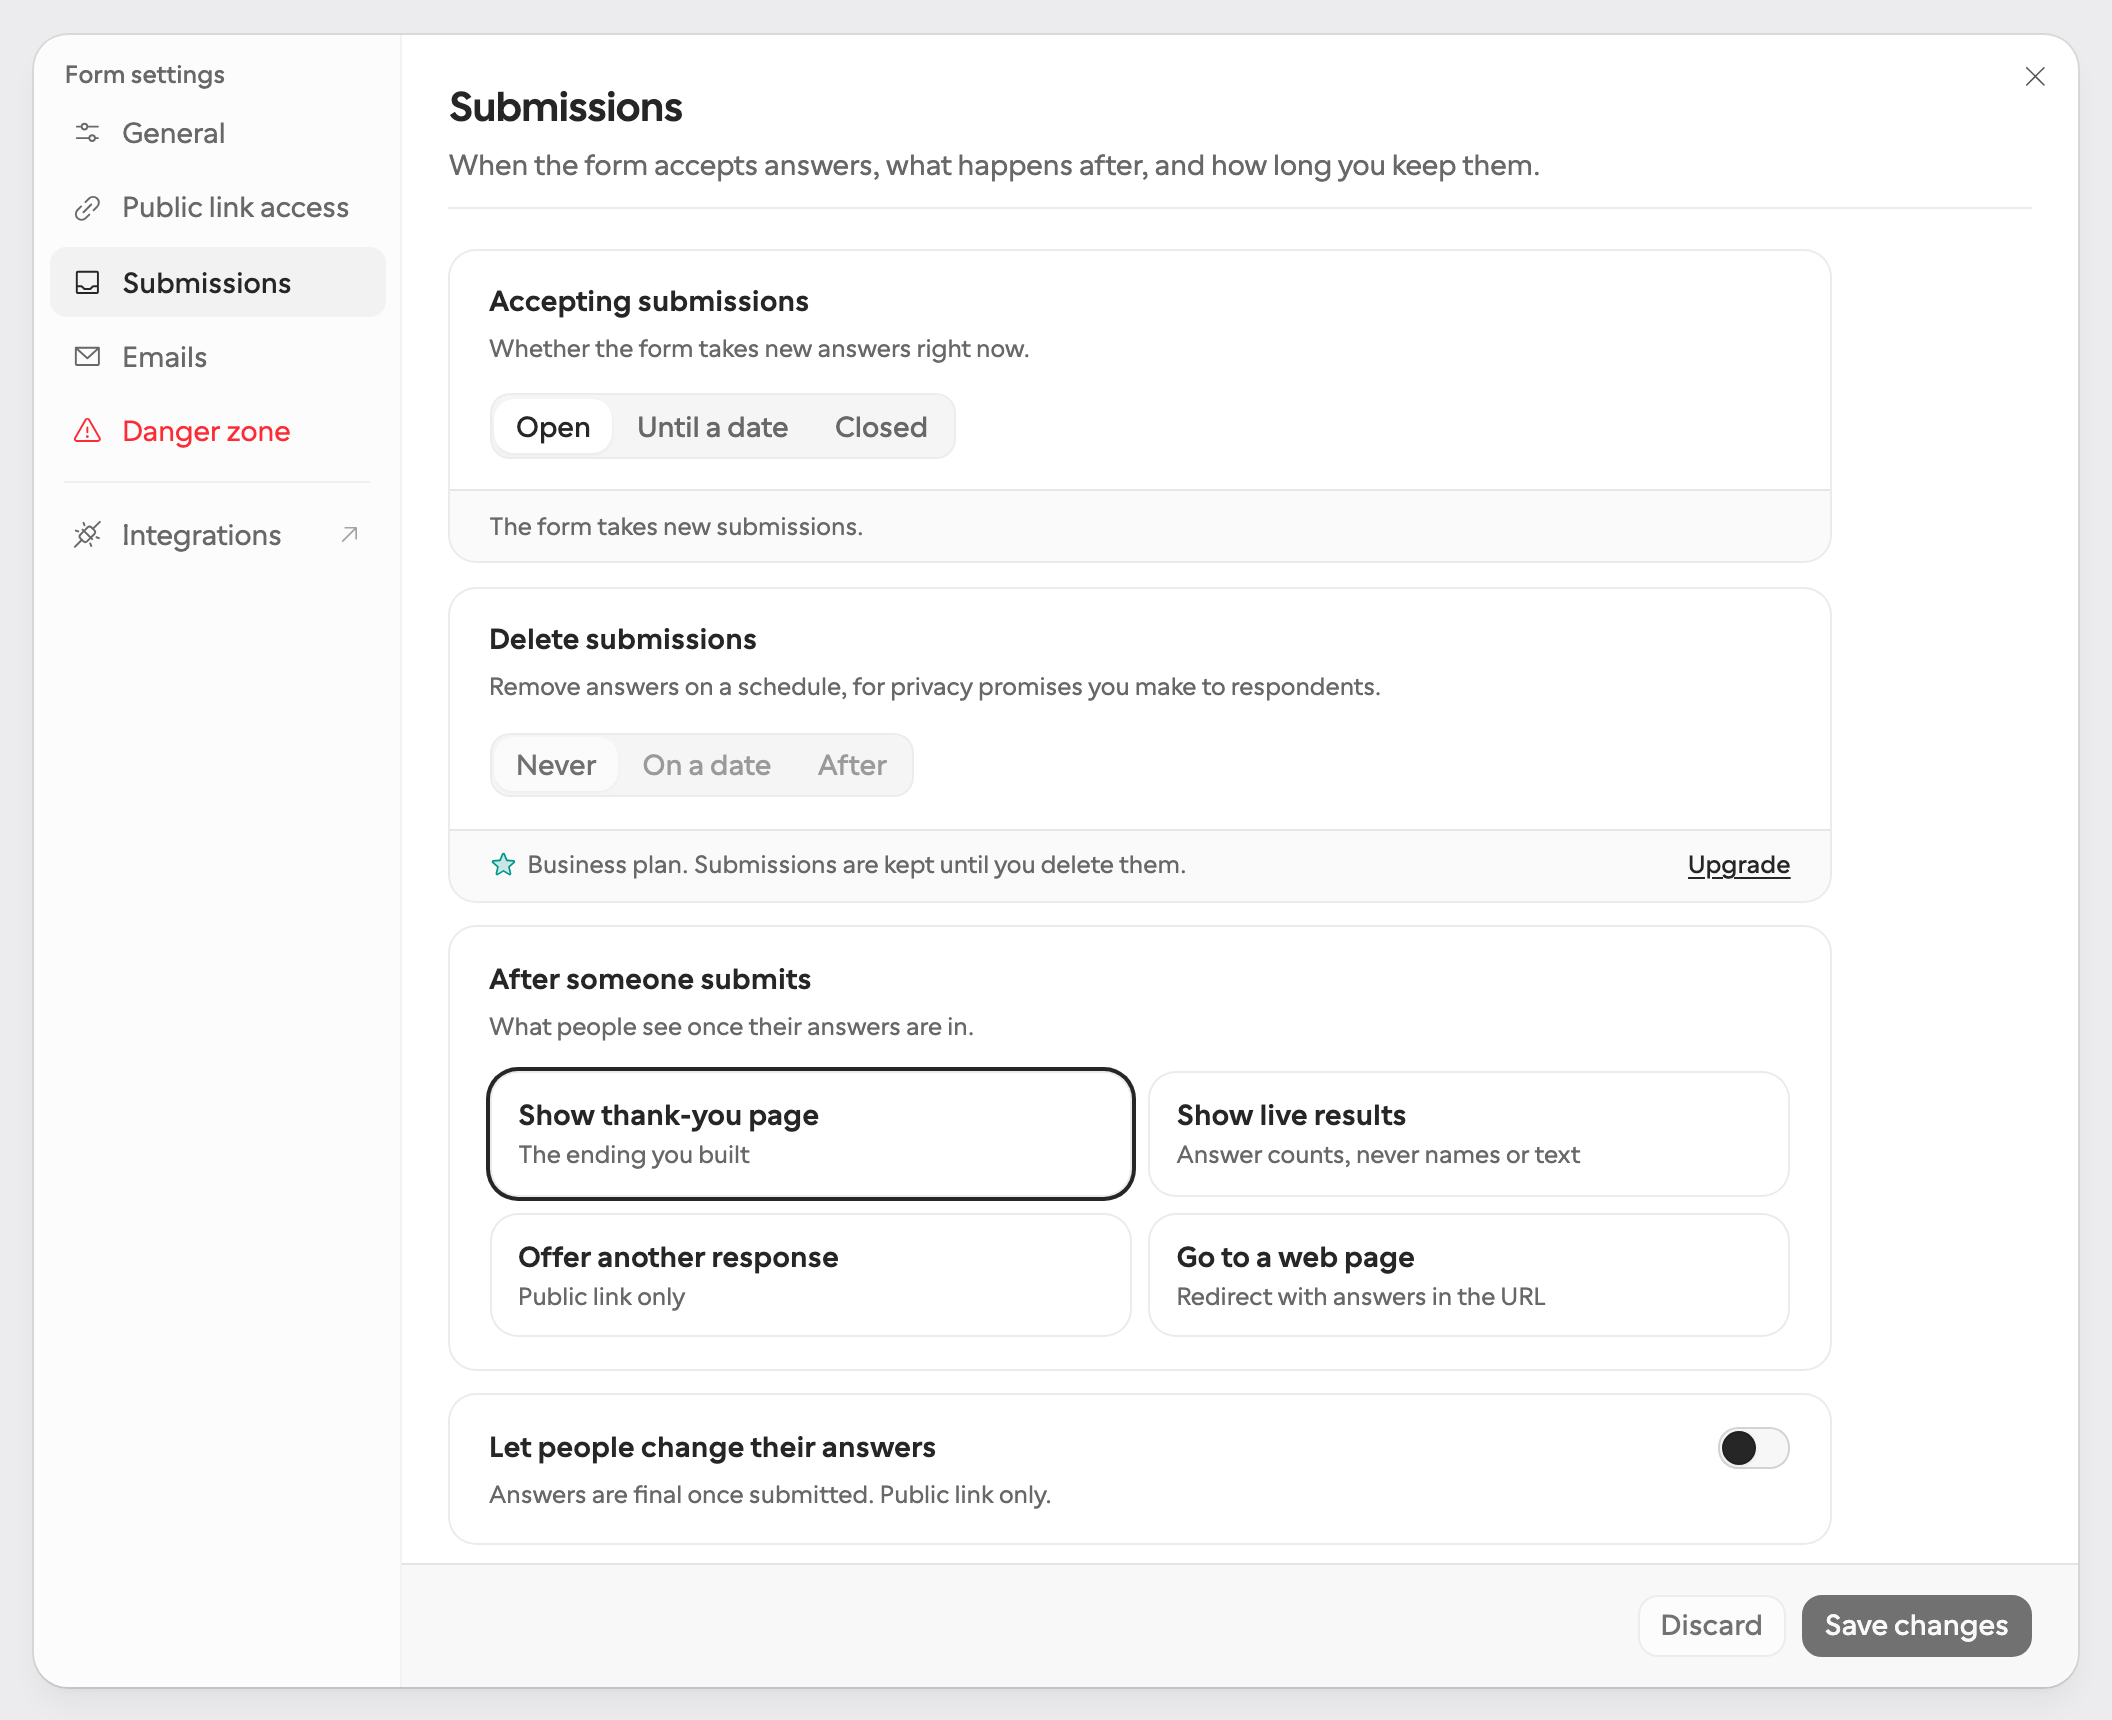
Settings, Submissions tab.
### What closing does
The form stays published and its links keep working, but:
- Visitors see “This form is closed”.
- People who already started cannot submit either.
- Reminders for unfinished answers stop.
- You cannot create new [requests](https://formstep.io/docs/requests/creating-requests/), and request links show the closed page.
## Cap responses on a share link
Each share link has its own response limit. Open **Public link** at the top of the form page, pick a link, open **Limits**, and turn on **Limit response slots**. Enter the number of responses, at least 1.
Use it to cap a workshop registration at 30 seats, or give each link its own cap, such as 50 for your newsletter and 200 for social media. The form as a whole has no cap, so to stop it at a count, set a limit on every active link.
### When a slot is taken
A slot is taken when someone starts the form, not when they submit, so 200 people cannot all start a 30-seat registration and lose their answers at the end. If someone starts and leaves, their slot comes back after about an hour. A submitted response keeps its slot.
### What respondents see
When a link is full, new visitors see “Response limit reached”. People who already started can still submit. Your other share links stay open.
For “the first 100 people, and only until Friday”, set both. The date closes the whole form; the limit closes only that share link.
## Limits per respondent
By default, each person submits once. To let people answer again, open **Settings**, **Submissions**, and under **After someone submits** pick **Offer another response**. It shows a **Submit again** button, and **Maximum responses per respondent** caps how often one person can submit.
The cap is strict for signed-in respondents. For anonymous ones, Formstep remembers them in their browser, so a new device gets around it. If the count matters, use the [authentication gate](https://formstep.io/docs/sharing-publishing/authentication-gate/). To limit how often someone can change a sent answer, see [Edit after submit](https://formstep.io/docs/submissions-analytics/edit-after-submit/).
## Next steps
[Share links](https://formstep.io/docs/sharing-publishing/sharing-embedding/) — Create a link per channel
[Redirect after submit](https://formstep.io/docs/building-forms/custom-thank-you/#redirect-instead) — Send respondents to a custom URL on completion